Showing posts with label sewing. Show all posts

Thursday, 1 November 2012

Why I shouldn't be near an iron


Hello there,

Yes, it is official, I should not be near an iron! Ironing seems to bring out the worst in me and it makes me ruin things.

Monday, inspired by the nasty weather, I thought I'd start on a warm hooded cardigan with a piece of woollen fleece I bought recently. It was an industry off cut with curious red writing on it (I love that kind of thing!) and I thought it would be good to use it to see whether the Maren hoodie pattern by Farbenmix would also work as an adult pattern.


The good news is that is does work. I used the second largest size, and not the largest, because I found the pattern to be quite generous in size. What you cannot see in the photo above is that I shouldn't have ironed the bottom. Thinking it would be safe to use steam on a wool setting, I happily went ahead and pressed the bottom seam with, to put it mildly, not the desired result. I should have known, because I did something similar before. So why didn't I think? The acrylic in the ribbing can not take the heat.


The bottom hem is now all wobbly. So sad. I have a glimmer of hope (ever the optimist) that the ribbing might turn back to its former springy self once I wash it again, but that is just the merest glimmer really.

Have a nice and cozy day,
TTYS,


Photobucket

Monday, 1 October 2012

Tunic

Hello and goooood morning!

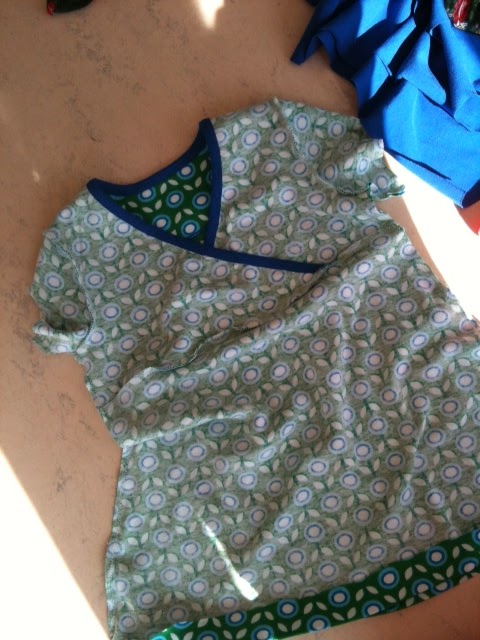
Do you remember this tunic and how it was soo big? This fact sat in the back of my brain, and when I needed (ha-ha-haw!) another tunic I tried one for myself in a size 158/164, and it did fit!


The material is a very sheer greyish green fabric. The only adornments are a few mother of pearl buttons, velvet ribbon around the arms and a bit of last minute in-front-of-the-telly beading. Of the latter, may I recommend that you do not try this yourself, as I already saw a couple of loose sequins after only 2 washes.

The pattern, as mentioned, is the Sammy pattern by Farbenmix. 

The fact that this tunic pattern is usable for adults has made me think I might use other patterns too. What about a nice pair of trackie bottoms à la Maren? The pattern goes up to a size 176, so maybe interesting for even more people?

Have a fun day today!
XOXO

Photobucket

Sunday, 23 September 2012

Skirty Scarf

Hello there,

Two years ago, while in Hamburg, I visited a shop called Gudrun Sjöden by a Swedish designer called, yes, you guessed it, Gudrun Sjöden. Although many of the clothes are not of a cut that suits me, I did really like the ethnicy feel of the place. Their clothes are well made, made with respect for those producing them, the environment and those who will wear them later.


So when I saw another shop in the Seven Dials area, we jumped straight in! If you, like me, like to hear some Swedish, go and visit because all personnel speaks Swedish. It sounds so funny and delightfully foreign (no disrespect intended)!

On the sale rail there was a cotton skirt in a gorgeous pink colour that was calling out to me: "buy me, buy me". It was only £15 so, overlooking the fact that it was in a size that would never fit me, I took it off the rail and tried to calm it down a bit, poor thing! Because of the large amount of fabric in the skirt, I started thinking of alternative uses for the material and decided it would make a lovely scarf indeed. Not that I needed another scarf, but I found that I just did not want to let go of the fabric. So that is what I did.

Firstly I cut off the waistband. Because I discovered the pattern did not join at the seam, I also cut both side seams and rejoined one on the pattern. Then I put in a very small roll hem on both the top and the bottom edges which would be the sides of the scarf. At the beginning and end I turned the fabric in about 1 inch or 3 cm, making a nice wide seam. And hey, presto...a very comfy and big scarf for just £15!


As you can see, the scarf isn't scrunched up anymore because of all the ironing I did on the seams. I need to rewash it and scrunch-dry it again.

Have a good day, and remember you are loved!

Photobucket

Tuesday, 4 September 2012

Patternless skirt

Hello you!

Recently I have seen all sorts of adorable bubble and puffa skirts and thought they would be perfect for our little skirt loving monsta'.

I fell in love with this sweet teal ruffle cardigan; perfect for coming autumn. And I had this Liberty-esque-fabric that I bought many years ago. These two things combined became our first autumn 2012 bubble-skirt-and-versatile-matching-cardigan-set!

Strange fact is that the colours are - again - blues and greens, and subdued colours at that. Sooo very unlike me. But anyway, ...


I'll explain how the skirt is made, super easy!

You measure up the waistline of your model and double the width, plus an inch or so, for side seams. You decide on the desired length of the skirt and add 10 cm or about 3 inches.

If you have lining fabric you want to use, cut one piece of lining fabric and one piece of outer fabric. If you have a different lining fabric than your outer fabric, skip the next steps and simply attach a waistband in the same fabric as your outer one.

Make a side seam to form a tube in both pieces of fabric.

Now put the lining into the outer fabric (wrong sides together) and make the lining stick out 3 inches or 9 cm at the top. Check you are even everywhere and tack together.

Fold over the inside fabric to form a waistband. It can be as wide as you like it; mine was 4 centimetres. Tack and stitch. Leave open 2 inches for the elastic. Stitch all the way around the top at 3 mm from the side. This ruffles slightly and gives a nicer waistband, at least, I think so.

Fold in the outer fabric and make another tunnel. Check you are even everywhere and tack together before stitching. Leave open 2 inches for the elastic.

For the waistline I used quite stiff elastic. For the bottom seam I used this very loose webbing elastic, nice and comfortable. It ensures your child can actually move whilst wearing your creation!


To customise the cardigan, I made a little yo-yo and added half a snap on the inside. This way I can take the yo yo off before washing and make different ones to go with different outfits. (yes, there is another skirt coming up!) The other half of the snap is on the cardigan, backed by a little circle of  felt in the same colour as the cardigan.


To be fair, this skirt has pockets, so is slightly more complicated, if such a term can even be used when making a simple skirt like this. Just cut the outer fabric in two and one of those pieces in two again (you will need a slightly wider bit of fabric to do this of course. I'd say 2 or 3 inches or 6 to 8 cm extra). Make a faux fly and nice deep pockets for all those special pebbles, sea shells and other treasures.

Please let me know how you are getting on, or better still, share your results!

Oh, and before I go, do you know this song? Good for days like today!


Talk to you soon,
love,

Photobucket

Wednesday, 29 August 2012

Sporty dress

Hi there,

How are you today? Sun is up and it looks like it will be another gorgeous day here, yay! Life is so much nicer with a little bit of sun, isn't it?

When our eldest decided she wanted to try playing tennis last week, we were not whooping straight away. I don't know, but it just doesn't seem very exciting to me. Hitting a ball, hmmm, backwards and forwards. What is the fuss all about? But when I saw her and her friends enjoying themselves on the court, it did grow on me a bit. A bit, mind you.

The fun part of it is, is that I got to make a new and sporty outfit!


The pattern for the vest I made for her earlier this summer was adapted into a little dress by adding a bit of extra width on the side seams (about a centimetre or so on each side),  lowering the hem to make the total length about 55 cm and tapering out the sides to make an A-line. I hope this is a clear description, in case you want to give it a try. It is all very simple if you have the pattern in front of you, honestly. Super simple and effective.

And then a print was all that was needed to add a little fun to the otherwise quite sober design. Presto!


When she tried it on she was very chuffed, which is of course, the best reward ever.

TTYL,
XO


Photobucket

Sunday, 22 July 2012

Racer back dress

Hello you!

Have you been enjoying yourself today? We had a good day here at the studio and I even managed to get a few shots of the dress I have been working on lately.

The idea for the dress germinated when I was reading a crafty book written by the very clever Norwegian Tone Finnanger, called Tilda's Atelier. If you have never heard of this lady or laid your eyes on one of her books or craft materials, I would recommend you do so asap because there will be lots of loveliness to be discovered!

Anyway, in the book she uses a circus theme that sat in my head for a couple of days, wanting to become something. Then, when I saw a pattern by the wonderful Crafterhours ladies, I knew what it was going to be: a little racer back dress with a circus elephant on it.


The pattern is free (A big Thank You, Ladies!) and can be printed straight from the link above. I hope you can see the print in the first photo. I apologise for the quality of the photo because my model got stroppy and this was the best I could get at the time.

I traced the elephant head straight from the book and ironed on 2 layers of non-woven interfacing to give it some stability and make sure the flowers from the circle behind it didn't shine through the light pink fabric. To be on the safe side I also put some fray-check around the edges before sewing it onto the background. I let a little pompom sit on the tip of the elephants trunk.

The collar is made by sewing two layers of dotted fringing together and attaching them at the base of the neck. I made the little flower necklace by attaching some small lace flowers on top. The Circus Elephantini lettering around the circle is in neon pink to make it a bit more visible. Oh, and I added two tiny green bells under the collar too. Just a little surprise and great when jumping!

TTYS,
XO


Photobucket

Saturday, 14 July 2012

Colour blocking

Hi again,

Do you remember the shirt with the unwanted snip at the hem in this post? It sat here looking very unhappy so I had to do something to make it feel better. After looking closely, I decided to open up the sides and take them in to 'move' the snip more to the seam and at the same time making the shirt smaller to fit my girl. I put in sleeves of a different fabric.  Then I covered the remainder of the snip with a little band aid in the shape of my favourite 4 leaf clover. Ahh there, much better!

To turn this shirt into an outfit I also made a short skirt and leggings. I used an old jeans skirt pattern (the Sara skirt from Ottobre 4/2008) because I have been wanting to try it out for ages (uhmm, for about 4 years I guess).


Don't pay any attention to the creases, it has been worn all day, it was nice(r) this morning, honestly!

The skirt pattern wasn't completely to my liking. Much too long and quite straight in the waist. I ended up taking in the sides a bit and putting in some elastic at the back. The end result is very, very plain to my liking, but I seem to be going through a phase of green and blues. I am more of a maximalist pink and red girl. Need to work on that, seriously!

XOXO

Photobucket

Good news

Hello there!

We are having a good start of the summer holidays, lots and lots of fun and activities (some of them quite wet), lots of relaxing, book reading and drawing.

Our good news for today is that both girls have grown! They will never be giants (phew..) but I really hope they won't be tiny either.

It didn't seem very important to me before, as I used to always be the smallest in my year and ended up feeling fine at 5.45 ft or 1.64 metres. Lots of women are around that height.
Since I met a fourteen year old that was 4.65 ft or 1.42 metres however, it dawned on me that that really is rather short, this side of the world. Ever since every inch is considered good news.


I still wanted to show you the wings I was working on, remember? Yesterday at the end of the day, the weather finally cleared and provided us with an opportunity for a quick photoshoot.


For the top I used a very old pattern that I adapted (Ottobre 2005, Singlet no 19). It is a boy cut, so originally very straight at the sides. I also deepened the racer back and front neckline a bit more. As much as I lurve the wings, I don't think they sit well on this top. I would have done better to make them smaller and  place them higher up the back. But there you go, another insight gained. If you fancy a pair, they are in the shop as of now.

XOXO

Photobucket

Tuesday, 12 June 2012

Little dress

Hi There,

Do you remember this dress? It is definitely a dress that I will be making more often. Very quick and very useful.

Between us, don't you think dresses are the best invention ever? Planning, or lack of it, seems to be an issue and preparing what I will wear the next morning is not something that works for me when I am trying to find my bed in the dark late at night.

When the weather is warm enough, slipping on a dress in the morning saves a lot of time and, providing you have the right shoes and cardigan to go with it, you are all set in seconds! Bonus is that you don't look a frump, which is what happens to me when the weather is not warm enough for light clothing. Don't you admire women who look the part all of the time, make-up where it should be, nicely scented and organised at eight (8!) o'clock in the morning? Power!

In the meantime though, I thought it might be a nice idea to make a mini-version of the dress for our little dress and skirt loving monster. This wonderful fabric was beckoning me to turn it into something, anything, just to get out of the pile where it had been sitting for a whole three weeks!


Well, what can you do? I love the print on this fabric, retro but at the same time 'toadally now'. The fabric is made from organic cotton which is a very good thing too. Perfect for a simple play-n-school dress, don't you agree?

One thing I did not like about the fabric is that it only stretches in one direction, width ways. This is something you should take into account when turning it into something else because it does influence the fall of the garment.

I'll show you what I mean by it. This is what it turned out like: a very wide and short dress.


 I used the pattern before, so I know it is not that. It might be a little on the wide side but not this wide. So I undid the sides and the top and bottom parts again, cut off about 2,5 cm on each side (which makes about 10 cm in all!) and added a 5 cm strip of fabric between the top and bottom parts. I added little bits of the royal blue fabric on the front (just thin strips of jersey folded lengthways) to emphasize the middle strip.

This description might be hard to follow but you'll be able to see what I mean when you look here.


Little detail on the inside (for my personal pleasure entirely because who would see such a thing?):


Oh, and on an unrelated subject, I can't stop grinning when I look at my wrist. Do you like it? Far from rainbows still (look here for other bracelets), but I'm slowly getting to grips with the technique. Such a simple  thing can make me so happy.


Anyway, love you and leave you for now,
XOXO


Photobucket

Thursday, 7 June 2012

Kirsten Kimono Tee


Hi there,


Because I am in dire need of some new summery t-shirts, I decided I might as well continue my t-shirt marathon just for a little while longer. Starting me off was the Kirsten Kimono Tee pattern that the lovely Maria from Denmark designed and put on her weblog. It is a free pattern so if you are interested I would suggest that you hurry over there and download the pattern!


The pattern is as simple as they come: only 2 pattern pieces (and neckline ribbing if you want it) and it has very clear instructions.

I decided to do a trial version first, using some pink jersey that I had lying around (I seem to have lots of fabric 'lying around' in the studio, but rarely big enough to be able to use it for myself - Different story though). When I bought it, it was nearing the end of the bolt and the lady in the shop saw it had some little blue stains on it so she gave me the remaining fabric for free. She didn't have to do it of course, but I was very pleased she did.

The original shirt has a slightly different neckline but I liked the idea of a little waterfall or cowl neck one, just to give a bit more interest to my very plain fabric. Adding a waterfall neckline is very simple to do. You just cut the original pattern underneath the arm and divide the top part into two or three little triangular sections before copying the result onto a new sheet of paper. Easy-peasy!

This drawing is very clear, I think. If you prefer reading it, here is the link.


And this is the result. I apologise for the slightly weird photograph as I was instructed to 'strike a pose' by my very helpful and lovely photographer. As you can see I also added another 10 cm in length to the original pattern.


So, a big thank you to Danish Maria for the pattern and inspiration!

Hope to talk to you soon (HTTTYS)


Photobucket

Tuesday, 5 June 2012

Life is all about slaying dragons

Hello you,

Can't remember where I saw this line, but I like it! It is also very applicable to my life at the moment.

Not that I go around hunting down dragons - what for, we're peace lovin' Veggies in our house and not in the slightest blood thirsty - but the feeling of fighting something quite big does seem to be a recurring item on our agenda these days.

Most of it is related to computer stuff, so probably boring and yet familiar to you (or maybe not at all and am I, unintentionally bien sûr, insulting your intelligence).

The delight of working with computers is enormous; we can't even imagine working or living without them anymore. But getting them to do what you want them to can be a bit of a struggle. And tedious. And frustrating. And time consuming. Did I mention boring?

Anyway, I like the slogan so much that I am considering doing some work on it and putting it up in the shop. With the small under caption 'but I am a Veggie' as an optional extra. Would you wear such a thing on your tee when you are having 'one of those days'?

Today I have been able to finish the last of my gift t-shirts. What should have been just a couple, turned out to be 8 in total. Here is the final one:


Don't know what the problem was, but the stitching on my cover locker is back to its well behaving self, even with the woolly nylon.


Happy to call it a day for now on the t-shirt front though!

TTYS,
XXX


Photobucket

Wednesday, 23 May 2012

More creativity


Hello There,

I am so much like a proud mammy that I am slowly realising that I might actually be (unofficially, until officially diagnosed as such by the Irish Proud Mammy Federation) a proud mammy.

Look at what our clever four year old made at school, isn't it lovely?


What about the use of colour, the different textures used?? And the likeness, a-ma-zing! Sorry to be such a brag about it, but I just love little gems like this!

Moving on from little gems to little Gems; this is the second Tee I have been making of this design. 


It is for a lovely two year old little Gem whom we'll be seeing soon. You might still see water marks as I tried to get the chalk marks out before I took the photograph. But they will dry soon, because the weather is gorgeous today.

Hope you have a lovely day outside today!

XOXO


Photobucket

Sunday, 20 May 2012

Happy day

Hello there,

Today for me was one of those days where you get lots done and happen to enjoy yourself at the same time too. Even though it started out quite rainy, the sun broke through around noon and made everything look even prettier.

I've been doing some work for the shop, did a little translation (okay, it was tiny, but still, it counts), we did a quick tour of a very nice 'farmers market' and we were invited to a very laid-back and happy little party on the beach. Pretty good for an average Sunday in my books!

Last week I also managed to get a couple of hours of me-time to work on a tunic for our Youngest Flower. I used a pattern by the German Farbenmix in a size 98-104, which should be for children of around 3 to 4yrs old. Although the pattern is easy enough, I couldn't get the original top part of the tunic to fit together as it should do. Many attempts later I still couldn't wrap my head around the way it worked (or should work, but didn't) so I decided to alter the pattern and do the top part again.

It turned out much better, but as I had feared, it was much wider than on the sample photos.
Measuring isn't my strong point, but because I have used the Farbenmix patterns before, I thought its sizing would be similar.

The tunic turned out a lot wider, in fact. The girls are of average build for their length, but the tunic just was way too big.

Just for fun Oldest Flower tried to squeeze in, but we were all surprised to see it did actually fit her! She would normally wear a size 122-128 (7-8yrs) and could fit into this tunic in a size 98-104!!
The sleeves of the tunic are of course shorter, but hey, 7/8 sleeves have not been invented in vain! Luckily she likes it and will be happy to wear it. Hopefully this week I will be able to finish it.

Have a preview of the fitting session though. Notice the wonderful Kaffe Fassett fabric with the clover and the even more wonderful tiny ric-rac in pink. I love it, it is so tiny. I've never seen it before and it just sets the two fabrics off beautifully.


Hope your day was as nice as (or even nicer than) mine of course!

XOXO

Photobucket

Wednesday, 16 May 2012

Magazine review: Selvedge

One of the things I like is browsing through magazines. One of my favourite magazines has to be Selvedge. It summarises itself as

"an independent, 100-page full colour magazine published six times a year. The magazine is image led and has an uncompromising design. Directed towards and international audience, Selvedge covers fine textiles in every context with illustrated features on fine art, fashion, interiors, ethnographic textiles, important collections, travel and shopping. The latest book reviews, exhibitions and comprehensive listings feature in every issue. The magazine provides a wide-ranging, unbiased and critical overview of the textile world".

I think that description does about cover it; only I don't think the last sentence is necessarily true. There isn't much 'unbiased and critical overview' as far as I have seen. But then again, the magazine is so lovely (and that even includes the paper, the smell, you know, the whole package) who can blame the writers to get carried away?

Hudson's Bay Point Blankets and Jonathan Adler Cushions
Cushions by Jonathan Adler


They feature lots of interesting textile artists and designers, talk about rejuvenated old techniques, new techniques etc. and basically inspire you to try out new stuff.
One thing I did find annoying at times is that they are quite heavy handed with their emails, which are mostly publicity for stuff they sell in their (web)shop.

Huopaliike Lahtinen Felt Slippers
Felt slippers by Huopaliike Lahtinen

Other than taking out a subscription (which is quite expensive if you live outside the U.K.) it is quite hard to get hold of a copy. If you would like to get a feel for the magazine there is always the website, so check it out even if you have just the teensiest penchant for fabrics. They even do an online version now, so I guess that solves the issue of delivery costs.

If you know of any interesting textile related magazines, I would love to hear about them so do drop me a line.

Photobucket


Tuesday, 8 May 2012

Easy peasy dress

Hey, how was your day Honey?

I hope it was nice and busy and that you have now settled for an evening full of nice things to cross off your to-do list! My to-do list is rapidly turning into a short novel, the rate I'm going but that is another story ...

Anyway, I wanted to give you a colourful glimpse of the crochet project I have been working on (for the last 2 years, it seems to want me to take it reeeally slow). But sadly it is not to be as the photo I took is on my phone and I can't seem to send it to my computer. I have recently changed providers and I'm having all sorts of little issues with it. Technology scares me sometimes.

So, on to the next project I have been working on recently.. the Ideal Easy Dress. When I saw a blogpost by a wonderful Belgian lady called Mina Dotter (Polkadotjes)on it a little while ago, and I got very exited. Upon reading the words 'one evening' and 'perfect fit' I got even more exited, because let's face it, sometimes a girl just needs a new dress PDQ. There even is a Flickr page on it, so you can see for yourself if you like it.

 The pattern is from Burda Style and the number is 7828. And my verdict (one down, many, many more to go) is that it does deliver. It is in fact, super easy provided you know your way around jersey fabrics that is. Getting to grips with the downloadable pattern (36 sheets of A4 paper that need to be assembled, no mean feat!) was more difficult than the actual sewing. To test this pattern I bought a cheap and cheerful royal blue fabric with smallish cream dots. Because I can't seem to be getting time in stretches lately, it has taken me longer than one evening but I am sure that if you have everything prepared and have a full evening ahead of you, you could actually do it. On the pattern there are two sleeves, a long sleeve one and a cap sleeve, but you could easily adapt your own favourite style of sleeve to fit the pattern. Thereby creating the possibility of making half a wardrobe full of perfectly simple but adorable dresses.


Edit: I hadn't looked in the mirror yet. Now, seeing the photos I somehow think I need to tweek the pattern a little or even just go up a size. It pulls and creases around the crossover part in a way that I don't like. I kept pulling it to get the creases out. Any ideas?